
Customizing an EnterMedia Application
1. Create an application Click on the Manager tab when logged in as an Adminstrator. If the default catalog doesn't open automatically, select the catalog where you want to create your application. Select the "Create New Application" option.  Fill out the fields in the "App Wizard" and then click Save.
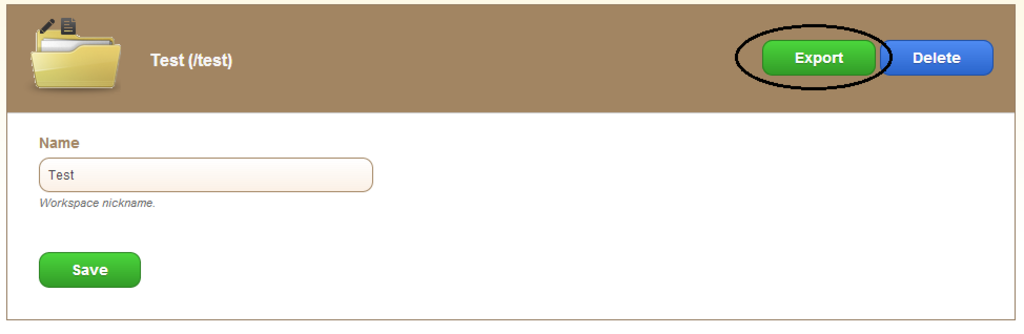
 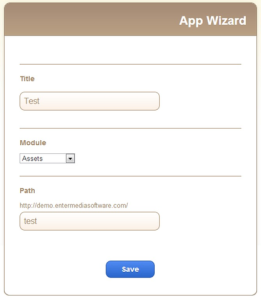 2. Export application locally When setting up a DEV, QA or staging environment it is best to use as many aspects of the production site as possible. The closer the resemblance between the two areas, the more relevant the testing and experimentation will be. EnterMedia allows DAM administrators to export applications or workspaces for backup and testing purposes. There are a number of items that are included and excluded in an application export. Many of the items that are excluded can be exported separately. The application export should not be considered a backup by itself. The assets, users, groups, roles and modules must be backed up, exported or recreated if attempting a full restoration. To export an application, select the application that you wish to export from the initial manager screen. Next, select the application itself from the list of currently installed applications. From the final menu, select export and choose a storage location for the zipped file to reside. The file can then be unpacked and edited locally.
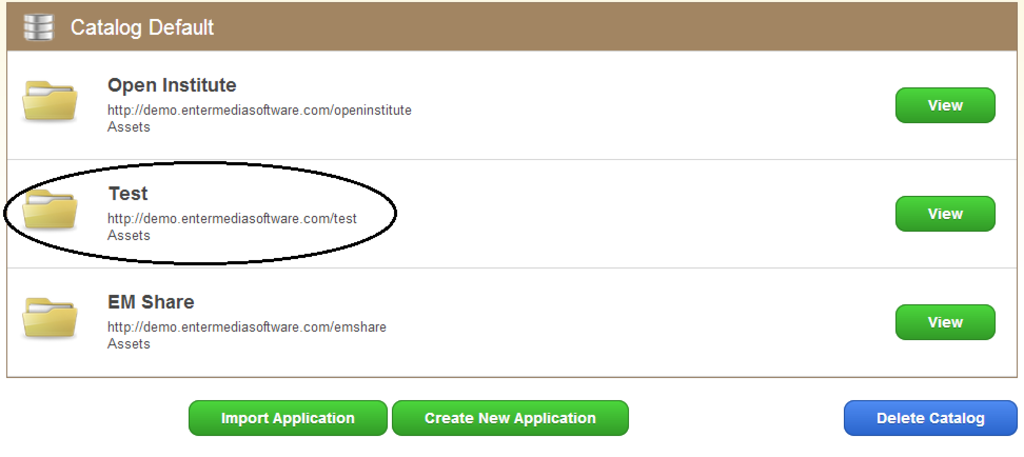
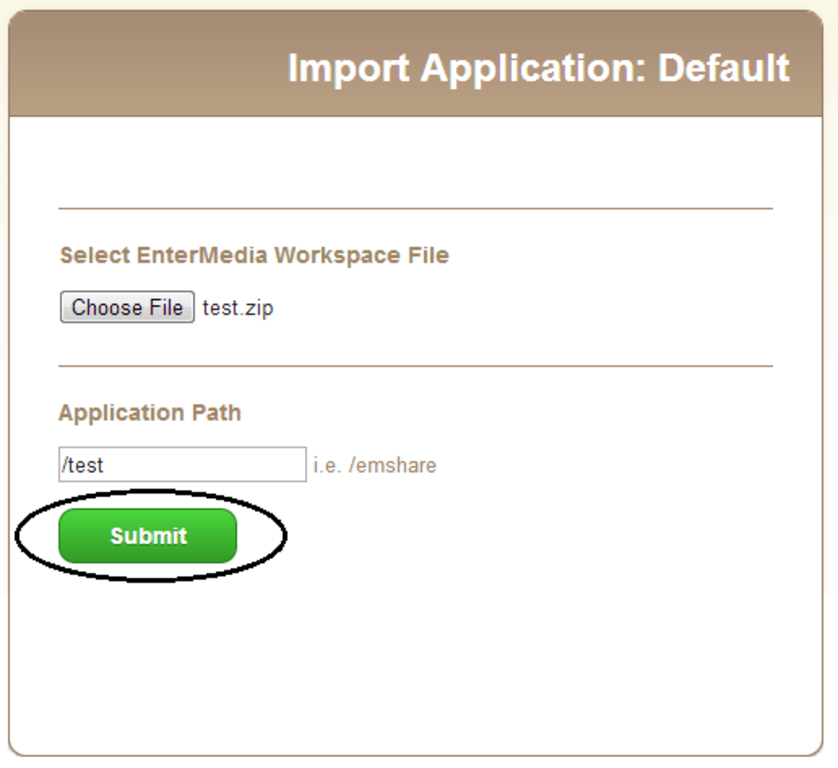
 What all is exported with an application? The theme or custom skin. Custom permissions. Special list tables. Scheduled events. Custom data views. What all is not exported with an application? Roles. Modules. Users and Groups. Assets. 3. Customize App Example - Override footer.html and add a custom download size There are several different ways to customize your application, but I'll go over a couple ways here by overriding XCONF & HTML files. NOTE: It is ill-advised to store custom files within the ROOT/WEB-INF/base directory. This directory and its contents are generated by EnterMedia. You should always place custom files within the directory of an application (e.g. emshare). Overriding the footer for your application: Create a footer.html file here {application name}/theme/layouts. If this directory structure doesn't exist, then create it. Now, whatever you put in this file will be injected into the footer section of your application site. For example, footer.html: <center> Test Company © 2013 </center> Adding a custom download size: Suppose that you want to create a custom crop for previewing and downloading image assets. The best way to go about this would be to override some properties in a _site.xconf file within your application's directory and specifically within {application name}/views/modules/asset/downloads/preview. For instance, if I create a sub-folder called "rosetest" and placed a _site.xconf file within it: {application name}/views/modules/asset/downloads/preview/rosetest/_site.xconf, then when accessing assets with "rosetest" in my URL, the properties in the _site.xconf will override those established in the _site.xconf in base. Here is an example _site.xconf file that overrides some cropping/viewing properties: <?xml version="1.0" encoding="UTF-8"?> <page> <property name="assetrootfolder">/${applicationid}/views/modules/asset/downloads/preview/rosetest</property> <generator name="convertArchiveDocument"/> <property name="crop">true</property> <property name="prefwidth">300</property> <property name="prefheight">300</property> <property name="x1">0</property> <property name="y1">0</property> <property name="uselegacythumbimages">false</property> <property name="sourcefile">image</property> </page> With this file in place, I can now access an image asset and have these properties applied, e.g. http://demo.entermediasoftware.com/emshare/views/modules/asset/downloads/preview/rosetest/By+Type/photos/Concert.jpg/thumb.jpg 4. Zip application back up and re-upload Compress your application back into a ZIP file. Make sure that the WEB-INF and other child folders are exposed within the ZIP directory and not buried in multiple folders. Navigate to the Catalog that you want to Import and Application into. Click on "Import Application". On the next screen, select "Choose File" to bring up a file selection dialog and find your Zip file and click "Open". Specify the application path by following the example and finally click "Submit" to import.
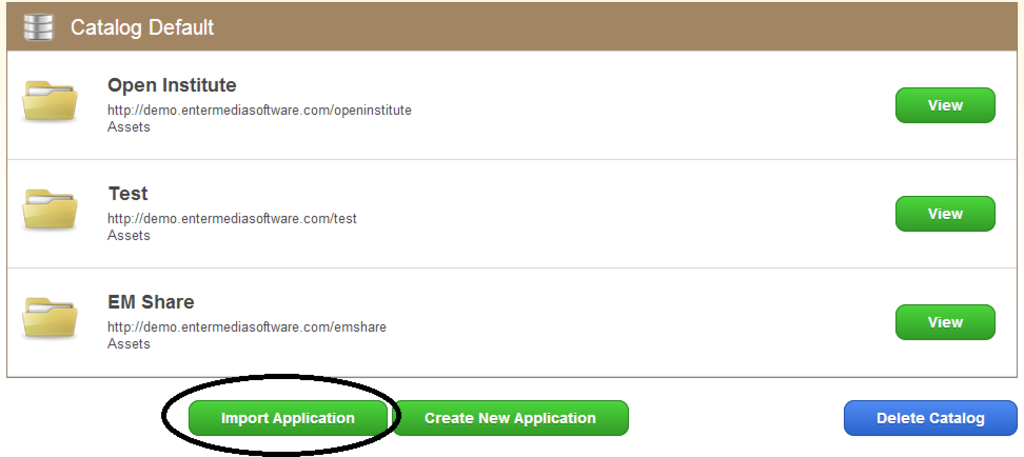
 When the application is imported into a new catalog, make sure that there is not already an existing application with the same name or the asset table and other key files will be over-written. Now that you've imported your application, the changes and customizations that you've made should be applied. How can assets be copied to the imported application? Assets are not included in a standard application export because they could increase the investment time and size of an export exponentially. In order to transfer uploaded assets to the new application the data directory must be copied from the WEB-INF folder. If the application was populated using hot folders then the hot folders themselves will need to be remapped in order to access the original files. In most cases it is sufficient to populate a test environment with only a handful of assets that belong to different groups, libraries and modules to test access and permissions. How can users and groups be copied into the imported application? If desired, users and groups can be exported in the user import/export area. It is not necessary to import an entire list of users and groups into a dev, qa or staging environment. These environments are best kept simple with a single user in each role or group for testing custom permissions, privacy settings, module access or any other special features.
Fill out the fields in the "App Wizard" and then click Save. 2. Export application locally When setting up a DEV, QA or staging environment it is best to use as many aspects of the production site as possible. The closer the resemblance between the two areas, the more relevant the testing and experimentation will be. EnterMedia allows DAM administrators to export applications or workspaces for backup and testing purposes. There are a number of items that are included and excluded in an application export. Many of the items that are excluded can be exported separately. The application export should not be considered a backup by itself. The assets, users, groups, roles and modules must be backed up, exported or recreated if attempting a full restoration. To export an application, select the application that you wish to export from the initial manager screen. Next, select the application itself from the list of currently installed applications. From the final menu, select export and choose a storage location for the zipped file to reside. The file can then be unpacked and edited locally. What all is exported with an application? The theme or custom skin. Custom permissions. Special list tables. Scheduled events. Custom data views. What all is not exported with an application? Roles. Modules. Users and Groups. Assets. 3. Customize App Example - Override footer.html and add a custom download size There are several different ways to customize your application, but I'll go over a couple ways here by overriding XCONF & HTML files. NOTE: It is ill-advised to store custom files within the ROOT/WEB-INF/base directory. This directory and its contents are generated by EnterMedia. You should always place custom files within the directory of an application (e.g. emshare). Overriding the footer for your application: Create a footer.html file here {application name}/theme/layouts. If this directory structure doesn't exist, then create it. Now, whatever you put in this file will be injected into the footer section of your application site. For example, footer.html: <center> Test Company © 2013 </center> Adding a custom download size: Suppose that you want to create a custom crop for previewing and downloading image assets. The best way to go about this would be to override some properties in a _site.xconf file within your application's directory and specifically within {application name}/views/modules/asset/downloads/preview. For instance, if I create a sub-folder called "rosetest" and placed a _site.xconf file within it: {application name}/views/modules/asset/downloads/preview/rosetest/_site.xconf, then when accessing assets with "rosetest" in my URL, the properties in the _site.xconf will override those established in the _site.xconf in base. Here is an example _site.xconf file that overrides some cropping/viewing properties: <?xml version="1.0" encoding="UTF-8"?> <page> <property name="assetrootfolder">/${applicationid}/views/modules/asset/downloads/preview/rosetest</property> <generator name="convertArchiveDocument"/> <property name="crop">true</property> <property name="prefwidth">300</property> <property name="prefheight">300</property> <property name="x1">0</property> <property name="y1">0</property> <property name="uselegacythumbimages">false</property> <property name="sourcefile">image</property> </page> With this file in place, I can now access an image asset and have these properties applied, e.g. http://demo.entermediasoftware.com/emshare/views/modules/asset/downloads/preview/rosetest/By+Type/photos/Concert.jpg/thumb.jpg 4. Zip application back up and re-upload Compress your application back into a ZIP file. Make sure that the WEB-INF and other child folders are exposed within the ZIP directory and not buried in multiple folders. Navigate to the Catalog that you want to Import and Application into. Click on "Import Application". On the next screen, select "Choose File" to bring up a file selection dialog and find your Zip file and click "Open". Specify the application path by following the example and finally click "Submit" to import.  When the application is imported into a new catalog, make sure that there is not already an existing application with the same name or the asset table and other key files will be over-written. Now that you've imported your application, the changes and customizations that you've made should be applied. How can assets be copied to the imported application? Assets are not included in a standard application export because they could increase the investment time and size of an export exponentially. In order to transfer uploaded assets to the new application the data directory must be copied from the WEB-INF folder. If the application was populated using hot folders then the hot folders themselves will need to be remapped in order to access the original files. In most cases it is sufficient to populate a test environment with only a handful of assets that belong to different groups, libraries and modules to test access and permissions. How can users and groups be copied into the imported application? If desired, users and groups can be exported in the user import/export area. It is not necessary to import an entire list of users and groups into a dev, qa or staging environment. These environments are best kept simple with a single user in each role or group for testing custom permissions, privacy settings, module access or any other special features.